by racheal | May 2, 2019 | DIY Techniques | 1 comment. I chose High Reflective White because this bedroom gets very little natural light and this color is 93% reflective! On drywall other than making a ver Hello:
So I just carefully cut in the edges of the circle with my brush. So, some people use a clear bead of caulk to secure the painters tape while they work. Our 1972 cabin just got real groovy, and were digging it! take a bunch of pieces of card board (scrap or go buy posterboard) tape them together in such a fashion as to completely cover your arc. For the top stripe we switched to a slightly redder orange that looked better with the coral and went on better! Its the perfect 1970s cabin bedroom complete with VCR and VHS Disney movies!! Your email address will not be published. But other than the paint issues this was a super fun project and I immediately started imagining other places where I could put stripes. You dont want to push a bunch of paint under the tape. Since going back to Lowes is about 25 minutes each way from our cabin I wanted to make it work and just kept putting up coat after coat, all of which were streaky, gloopy, drippy. To paint the curves, I didnt use tape at all, but just painted everything by hand. 2018 - Burritos and Bubbly. Any suggestions on how to best do a straight cutoff along the protruded corner/e HI
Sherwin Williams sponsored this post by giving me me all the paint I needed! 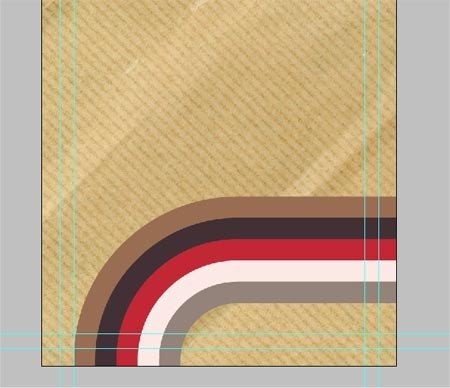 For the rest of the walls, you can use the exact same technique that you used for the priming. I always keep a tiny artists brush handy to go over the edges as the last step, so theyre super crisp and clean.
  Measure and mark your pattern on the tape, and carefully use a craft knife or a utility knife to cut out the spaces you want to paint. For my base I used Sherwin Williams Emerald interior paint. Shoot I even styled this sucker. Painter's tape can be your best friend when painting baseboard, trim, and ceilings. By the way, I believe I have plaster walls in my 60 year old house. You can adjust the roundness or droop of your arc by adjusting how much string is in between the tape bits. This time, I had to tape the other way which meant a different application of the tape since this time it was applied to the bottom of the curve. We had originally chosen a more yellow-orange for the second stripe from the top but ultimately went with a peachy coral to reflect our tile choice in the hopefully-one-day-renovated bathroom and looking at this photo, the sunrise definitely is full of a near exact shade. Read our guide to learn how to easily remove mold from wood. You should also make sure the paint roller is fully loaded," meaning it is full, without soaking it too much either. We often link to other websites, but we can't be responsible for their content. The colors I used in this mural are Knockout Orange, Blue Chip and Gusto Gold. The key to getting sharp lines is to press down on all of the tape edges with a credit card or something similar. Youll need a scraper tool like a putty knife as well as a sanding sponge to level out your holes and damages. This should be done gently, or you can cause roller marks. But they can still curve into bullnose corners. Begin by applying a 2-inch ribbon of primer to the framing edges of the wall. The flowers, branches, and leaves of this wall mural are made up of smaller, easily-assembled shapes. Back when I was brainstorming about how I wanted to decorate my house, I came across a picture on Pinterest of a wall painted with 2 contrasting colors in a curve design. Once the painting is completed, you can restore all of the hardware and wall plates that were removed earlier on. However, it can also be pretty simple to repair with spackle or joint compound, which is also known as drywall mud. Make a template and then trace the template. Our downstairs bedroom, or guest bedroom, features a full wall of windows that overlook the lake, so we took inspiration from the epic sunrises that rise over the bay to choose a color palette of oranges and blue-greys to represent the sun and water, to go along with the deep blue we had already painted the whole wall. This error message is only visible to WordPress admins, Primary Bathroom Before and After | Color Edition, How I Planned My Colorful Bathroom (and made my tile pattern!). The other shade of orange had the same issue of being thin and having no coverage, so I think that was due to the base used in those shades of orange. Then cut small strips of tape and align them on the curve. submitted to our "DoItYourself.com Community Forums". Ashbee Design blogger Marji Roy used this cover-and-cut design. Some walls curve at the corners, and these bullnose corners can make painting jobs a little more tricky than usual. thanks. Most of them allow you to simply press the tool against the wall, then slide it while supporting a pencil. Check out Mallory and Savannah's diamond pattern on Classy Clutter. Again, its important to work in smaller areas. First draw gentle curves lightly on the wall with chalk.
  So weird.
  if you prefer that popular brand. Should Your Front Door Be The Same Color Inside And Out? How To Clean Cedar Wood Walls [Inc. Mildew], Can You Sand Concrete Walls? we're afraid a brush will not create a neat line and it's important that the line be neat. Copyright 2022 This Old House Ventures, LLC.
  And it is written with great skill and the words directly explain the thought of author. :), Recycled trash window installation The Purple Tree! Mold commonly grows on wooden surfaces, as wood is very good at absorbing water. Here is a little trick I learned sewing believe it or not. You may still find some paint has bled underneath.
  And I still need to finish styling all the shelves. HELP, Hello Annette,
Aside from making a V-shape, you can also try to work more quickly. Then I just continued upwards lining up the tape across the wall and frequently checking it with a level to make sure it wasnt becoming crooked. Now that I have removed most of this loose material, what do you recommend? This week has been big on finishes. Otherwise, you might stain your drywall. In this review, the This Old House Reviews Team researched the five best solar generators on Amazon to help you find the product thats right for you and your home. We use cookies and other tracking technologies to improve your browsing experience on our site, show personalized content and targeted ads, analyze site traffic, and understand where our audiences come from. November 21, 2008 at 8:00 am Choose a tape that's as wide as you'd like your primary stripes to be. Also, people just dont really notice the imperfections in your curves. Arent the colors amazing (imagine how much better they were in real life! Now break out a ruler and pencil. For stains and hard grime, you can also lay a drop cloth on the floor beneath the walls so that you can lightly wash the area. It acts as a bonding agent for the drywall so that you wont need to apply so many layers of paint. This technique can make each layer blend more naturally. And why is there an outlet 3/4 of the way up the wall? This will allow you to accurately mark the drywall. This should create a smooth, blended look. Click here to find this spackle on Amazon. Touch up whatever looks wonky afterward. Questions of a Do It Yourself nature should be Once you mark where you want the straight edge of your paint to be, you can use painters tape to help you create the desired layer.
And I still need to finish styling all the shelves. HELP, Hello Annette,
Aside from making a V-shape, you can also try to work more quickly. Then I just continued upwards lining up the tape across the wall and frequently checking it with a level to make sure it wasnt becoming crooked. Now that I have removed most of this loose material, what do you recommend? This week has been big on finishes. Otherwise, you might stain your drywall. In this review, the This Old House Reviews Team researched the five best solar generators on Amazon to help you find the product thats right for you and your home. We use cookies and other tracking technologies to improve your browsing experience on our site, show personalized content and targeted ads, analyze site traffic, and understand where our audiences come from. November 21, 2008 at 8:00 am Choose a tape that's as wide as you'd like your primary stripes to be. Also, people just dont really notice the imperfections in your curves. Arent the colors amazing (imagine how much better they were in real life! Now break out a ruler and pencil. For stains and hard grime, you can also lay a drop cloth on the floor beneath the walls so that you can lightly wash the area. It acts as a bonding agent for the drywall so that you wont need to apply so many layers of paint. This technique can make each layer blend more naturally. And why is there an outlet 3/4 of the way up the wall? This will allow you to accurately mark the drywall. This should create a smooth, blended look. Click here to find this spackle on Amazon. Touch up whatever looks wonky afterward. Questions of a Do It Yourself nature should be Once you mark where you want the straight edge of your paint to be, you can use painters tape to help you create the desired layer. 
 Let the Demo Begin! Most likely cause for the AC having a bad day? Also make sure your paint is not too runny. With a paint roller, create V-shaped strokes across the walls. Your email address will not be published.
 As such, its crucial to learn how to mark the desired painting line and properly apply painters tape. I made sure the bottom of the tape was smooth (where I would be painting against) and the top wrinkled as I went along to accommodate for the curve. This is a great way to seal the painters tape without pesky caulk or bleeding. Keep reading to learn how to paint these odd corners, how to make sure your walls are painted evenly, and if roller marks naturally go away. Of course I could have used a primer, but I didnt really have time to go through that extra step and since the paint was so thin I still think it would have needed several coats. 1 comment, http://www.wallstory-murals.co.uk/mural_details/Trees/LoveBirdTree_details.htm, http://magic-mural-factory.com/Level_1/Mini%20murals.htm, YAY Finished my New Love Bird Tree mural. I used 2 painters tape so each stripe is about 4 wide. For the full how-to, check out the Interiors by Kenz blog, written by Mekenzie Burton Crowder. I mixed each center color (the most intense color) with one part color and one part white. The old paint covering the wall didn;t reveal wallpaper, so I was pretty surprised! However, these methods are still likely to end up with an inaccurate edge overall. Next,paint on some simple, bold flowers. Ill give it a whirl and let you know how it goes. Design & content by Andy & Kerry Bindernagel.
Looking forward to showing you more paint changes in the house!

 Use a paintbrush to work the matching paint towards the painters tape. You can try to create a straight edge by eyeing it or using multiple strips of painters tape. document.getElementById( "ak_js_1" ).setAttribute( "value", ( new Date() ).getTime() ); Your email address will not be published. Now, you should use a paintbrush to apply your new paint color away from the tape that runs along the marked straight edge on the wall. Also, I didn't use the ceiling paint as a primer in order to cut costs, I used it because old paint is hard to dispose of and I thought this might be a good use for it. Using tape as a guide is way easier than constantly having to measure to some more complicated width no math involved! Pencil it smoothly. Thank you for this- very inspirational! the curve is definitely not part of a circle - just a gradually curving line. All rights reserved (c) 2018-2022 HomeDecorBliss.com. When we were deciding what direction to go with the styling of the cabin as a whole, I was first thinking the obvious preppy lake house or rustic cabin, but after spending our first few days there, Andy and I both said, this place wants to go back to its 70s roots and have some FUN with it with some of our modern, minimal tastes mixed in. By logging into your account, you agree to our. Peel and paint.
  Is this curve a segment of a circle or more of a french curve? So he tried something different: he measured the exact width of each stripe and drilled a hole in a yardstick exactly where the edge of the line would be, plus a hole for a nail. I use this method for drawing oversized circles all throughout my house. Ok. Lets talk arches.
  Ok, now that Ive talked your ear off about these arches, lets go check out the other designers! Mark that center point by placing your thumbtack. Roller marks are mainly caused by loading your paint roller without using enough paint or painting with the wrong amount of pressure. Photos taken by the fabulousNanette Marie Photography. I am thinking about using a product called "Zinsser 1-2-3".
  After that, for each step outward I would cut my mixture with another 50% mix of white. But drywall mud can be better suited for unusually large damages. When you pull the string taught the pencil should meet up with both ends of the lines.
  So I mixed in a bit of white. , When tropical meets 4th of July for some colorful, To celebrate two incredibly creative and beautiful, And now I want to paint no less than 8264 more col, Adding color and lots of little personalities and, Whenever Im in a creative slump, it works for m, Yup, in case youre wondering Esther has request, Yup, you can totally see the pencil line under the, Ill take Monday and raise you a pair of happy t, How to make a felt Christmas bulb garland (or ornaments). Now you can successfully paint the area without bleeding or uneven lines. The surface I painted this mural on is raw plywood and MDF which meant that they needed to be primed first. to this site, and use it for non-commercial use subject to our terms of use. Tie one end of a piece of string to the thumbtack and measure out your specific distance. Tie this to your pencil. What Are Sheer Curtains [With 11 Examples]. Looking good! This way, you can continue to use the wet edge from the last layer of paint rather than letting it dry completely. We're Kerry and Andy from Cleveland, Ohio -- welcome to our blog about home improvement, design and life of a modern family. Your email address will not be published. Youll thank me later! This was a bit of trial and error with each color, but the orange is the one that was simplest! Not looking for a cookie-cutter design? =) Happy painting. Always remember anyone can post on the MSE forums, so it can be very different from our opinion. I used a wooden paint stirrer because its what I had handy. 1995-2022 MH Sub I, LLC dba Internet Brands. Then be sure to press the paint away from the tape as you go, instead of towards it. How to make a fruit slice summer swimsuit wet bag!
  Open stairs - glue and screw, or just screw? Watch the video to see this in action! Posts may include affiliate links. Its a foolproof method and still only took a couple of minutes to set up. To guarantee straight edges in your design, cover the entire surface you want to detail by laying down strips of tape side by side. I don't think I'm brave enough to add curves to my rooms, but if I was, the tutorial was very helpful and I'd feel confident following your steps. Tired of running out of hot water? Next, youll want to clean the surface for dust and filth. thanks. Thank goodness. Spackle is easier to use and it dries quickly, which makes it the most common solution for small holes, cracks, or dents. Now if you wish, paint the other half of the wall and allow the paint to dry before removing the tape gently to reveal the design with a line between the two colours. Any other similar obstacles should also be removed. Website operating If you make a mistake, dont wait until its dry, wipe it off while its still wet. Then, use a loaded paint roller to apply a full layer of primer to the rest of the wall. In this case, youll have to decide if you want to prioritize one of the colors, letting the preferred color wrap all the way around the rounded corner. I am going to assume your line will curve like it is the "top" of an arc not the bottom. Work from top to bottom and from one end to the other. This info does not constitute financial advice, always do your own research on top to ensure it's right for your specific circumstances and remember we focus on rates not service. See my previous post to see the furniture and mural from Kidtropolis. Get the latest This Old House news, trusted tips, tricks, and DIY Smarts projects from our expertsstraight to your inbox. I only had a weekend to work on this, so I had to give up with it half done, with paint that didnt work, and drive back home wondering if this project would ever actually be finished. Dont make the curves too tight as it will be difficult to bend the tape to shape. Where there are little creases in the tape, flatten them down to stop paint from seeping under the tape. After the new paint was on the wall about one hour I noticed large "blisters" forming on one of the walls. Additionally, you may smooth out your layers of paint with the same roller that you used to apply them. The simplest way to precisely space stripesno ruler requiredis to measure them out with tape. For more info on this trick, check out blogger Bri Emery on Design Love Fest. Its usually fine to simply use water and liquid soap instead of commercial products to save money. The Emerald paint goes on so smoothly too. Lay down painters tape to protect the baseboard trim at the foot of your wall and any crown molding trim at the top of your wall. Even though we had it made fresh that morning, it seemed as though it wasnt mixed properly and there was always an oily streak in the can. It makes all other whites look dingy. Two walls with different colors can meet at a bullnose corner. I just used a level to mark my bottom line and taped all the way across the wall, except where the curve would be. There are only a few important steps to follow when you need to paint a curved wall with unique bullnose corners: Painting a curved wall is mostly similar to ordinary walls, but the rounded bullnose corners need special treatment. Or, you can make the colors perfectly even by cutting the bullnose in half with a centerline. Don't let cutting painter's tape be a daunting task. Please also read our Privacy Notice and Terms of Use, which became effective December 20, 2019. You dont want your colors to be too dramatic of a jump or too subtle. Use wider tape for a wider line. I finally had to admit defeat, return that can to Lowes and get a new one. However, it would be much easier to use paint that matches the existing wall instead.
 I think I could have finished the whole thing in a weekend if everything had gone according to plan. Drywall is already bumpy and tough to work with. Picking colors is always most fun part! You know I trust your opinion. Should Kitchen Cabinets Match Interior Doors? Work in V-shaped rolls, working from top to bottom. Avoid dunking your roller all the way into the paint. This will create the impression of a 90-degree angle from most reasonable distances. We also immediately agreed, this room needed stripes! Drywall is generally weak and easily damaged.
 Im cringing at each picture I see it in! Once we had all of the straight lines taped off, we then measured for the curve. But bullnose edges will often require special tools and techniques. Do note, while we always aim to give you accurate product info at the point of publication, unfortunately price and terms of products and deals can always be changed by the provider afterwards, so double check first. document.getElementById( "ak_js_1" ).setAttribute( "value", ( new Date() ).getTime() ); Hi there! DoItYourself.com, founded in 1995, is the leading independent Rip, cut, and piece together tape to create totally unique shapes. Copyright Could I have been more clear in my instruction? Paint below or above the line, always brushing the paint away from the tape rather than to into it, to stop the paint from bleeding under the tape. Sigh. Use a ruler and pencil to sketch your stencil on the tape, then cut out the desired spaces. Find the center of the curve by measuring the distance between the two lines and dividing by two. Walls are mainly straight due to practical reasons, even for spiraling staircases. First, youll want to remove any hardware, which mainly includes all of the wall plates. i'm not sure what a french curve is :-) but our walls are 30 ft long and the curved line begins at one end about 3 ft from the floor, climbs gradually all along the wall to meet the other end about 3 ft from the ceiling. Disclosure: We may get commissions for purchases made through links in this post. You can begin with these troublesome corners as you would with any wall. Since our plaster walls werent perfectly smooth, there were a few places where it bled, and in my experience that almost always happens no matter how hard you try. To start, I figured out where I wanted the bottom of my stripe to be by sticking a piece of tape on the wall and standing back until I got the right height. If you plan on painting the ceiling too, you can check out our post Should You Paint The Ceiling Or Walls First? I used blue painters tape and marked out my lines in bathroom. suggestions. Ill probably just paint the smoke alarm and hang a lamp in front of it and the outlet. View our Privacy Policy here. Then, apply painters tape to the desired edge that you marked for the paint job. I used about 6 inch long pieces and curved them along the chalkboard paint. Remember to use this method on small areas until you have finally covered the entire wall. Thanks, Bill, Interior Decorating, Design, Painting, Upholstery and Fabrics Center, Painting & Staining. does that answer your question? I started with the top stripe and then the third stripe. If youre making an arch you first outline your two straight outer edges. One common method is to attach a pencil to a string and the string to a nail in the wall and then pull the string taught to draw the line, which will automatically curve as you go. According to specialists, roller marks will not disappear on their own. Should You Paint The Ceiling Or Walls First? I made sure they Hi everyone! I am painting a 70s stripe in my kids jack and jill bedrooms/ bathroom and this is just what I needed.
  Im so, so, so, so, so happy with how everything turned out. Ok. Not really. You may freely link It turned out lovely, and I am thrilled with this one-of-a-kind addition to our dining room. You can wipe away the chalk if you dont like the layout and redraw until you are happy. ): As you saw in the video, we actually switched up paint colors halfway through since two of the original colors just werent working.
  Lastly, you can try to line up your edge with the joint of the baseboard trim on the foot of your wall. If you purchase an item featured within, we may receive a small compensation, while you would pay the same amount, and it is completely anonymous. Its been beautiful.
  When I took a putty knife to the blisters, the paint began to come off in large sheets that appear to be wallpaper. Its tricky. He stuck the nail in the wall and then could put a pencil in each hole, turn the yardstick, and have perfectly even lines. Interior stripe painting procedure? Painting Seventies-Style Stripes at the Cabin! This project intimidated me and seemed like it was going to be really complicated, like there would be math and so much measuring, but it was so much easier than I thought it would be! Lay down strips in alternating widths until the entire area you want to paint is covered.
  Which is so exciting for me. For a quicker trick, simply stick a piece of tape on the edge of a plate (or any round object), trace the curve, and cut. These are used to cover up your outlets and light switches. You can also use a very fine grit sandpaper to level down the paint. What I do is essentially make my own compass with a thumbtack, string and pencil. To fix the issue, you can apply touch-up paint with a roller, working in the same direction as the original layer. After the tape was in place, I removed the string. Begin sticking the tape to the wall following your lines and coaxing the tape gently into shape around the curves. Paint rollers could easily follow a concave curve from side to side. Take a piece of string and tape it with low tack tape to the spot where you want your arc to begin, then tape it to where you want your arc to stop. All information is provided "AS IS." i have only tried using turps but no no avail. Some paints include primer in the formula to save time, but not all colors are available this way. All Interior and Exterior Surfaces, Curved Concrete Block Retaining Wall Tips, How to Build a Curved Concrete Retaining Wall, How to Build a Curved Brick Retaining Wall, Curved Glass Block Wall Construction Tips, paint cutoff on rounded wal corners question. Add to this moisture warm temperatures and mold spores (which are always in the air), and its the perfect storm for a mold infestation.
  Once that was dry, I had to do the 2nd coat of grey on the top half. If necessary, add another coat after the spackle dries. Before taping the whole thing, we also had to determine where we wanted the curve to start, which was also just a matter of eyeballing it until we found a spot we liked. =), A mind blowing article is provided here.

lincoln city fc vs mk dons head to head